![]() MechCommander 2
MechCommander 2
Mad Ogre's take on MechCommander 2.
As a real time strategy game, MC2 is fantastic. Unlike other games this one doesn't allow you to gather resources and build new units and just "throw money" at a situation. This game make you have to sit back and think problems through. You have a limited pool of resources and while you can capture more resources, it's not very much. This forces you to really use your brains. You can't just tank your way through a mission and expect to win. If you try that, your pilots will be ejecting from burning Mechs before you will even know what happened.
I like this game. I like this game a lot. For a strategy game, this one has something going on that let's me really sink my teeth into it. I give it an 8 out of 10. Some cool things that they added to this version: Moveable Camera Angle with pan and zoom. Some very cool new Mechs. Some very cool new weapons. One thing that still bothers me is the lack of some of the "Old Favorites"... some Mechs that didn't make it into this game. But that wasn't the game makers fault. That stems from a business deal between the BattleTech people and rather silly RoboTech people. Evidently the RoboTech guys decided they didn't want to play anymore and told the BT guys that they can't use the RoboTech designed Mechs. The Battle Master, Wolverine, and especially the Marauder are missed. Whatever.
Here is some Ogre Strategy. Standard Mech load outs are OKAY, but not great. They will need to be adjusted depending on the mission or your style of fighting. I like to use a One-Two approach whenever possible. I like to position some heavily armed Mechs and use a lighter and faster Mech to suck the enemy into a kill zone. Especially if you have some well placed artillery pieces. Once you drop some Arty, that's were it stays. So use them very carefully and they will make or break a mission. I like to use them in a tight group of 3... Three Long Tom's will kill even the mighty Atlas with just one or two salvos. Lighter Mechs have ZERO chance of getting past firepower of that magnitude. Okay, back to my load outs...
I'm not going to tell you what to load out, just give you a couple pointers. It's very easy to just load out every Mech with one or more PPCs. I even tried a Mad Cat with 6 of them. It didn't last long. Medium range weapons can be potent, but they are also some what of a handicap. How is that? The enemy, if it can move, will never stay in medium range very long. The enemy will stay out of range and hit you from long distance, or they will rush up inside where you can't hit them. ALWAYS give your self at least two layers of weapons... Long and Short. Seriously. If you can hit them hard at long range, they may never get the chance to hit back... or at least once they do get inside your long range weapons, they are stripped of armor, heavily damaged and thus easy prey for your short ranged weapon arrays. The Clan ER PPC is a good long range weapon... but often I like Missiles. Missiles rock. They can fire at targets out of line of sight. Meaning you can camp some Mechs with lots of LRMs and send a little Scout Mech over a hill, sight the targets, and have the LRMs do their thing. Another good thing about LRMs, they attack from a higher angle than other weapons. This gives you a better chance of a head shot.
Headshots are great. If a Mech's head gets damaged too much - the pilot will eject. I once tagged an Atlas in the head, causing the pilot to eject, with no damage to any other location. SWEET. I ordered a recovery vehicle in, took that Atlas, and used it to ravage the enemy. That is one advantage you have... Recovery and Repair. If you take out another Mech, you can recover it, then fix it, then use it. Takes a lot of resources, but its worth it. After a mission, you always have first dibs on the salvage, and you can pick the Mechs you want... but it's costly. If you have the points, recover that Mech before you end the mission. Also recover any Mech of your own that your pilot punch out of... You don't want to have to pay full retail prices to salvage your own Mech.
There is one mission that lets you capture a weapons facility that gives you a new weapon to load out. The Long Tom. Thats cool because you mount a couple of these in your drop teams, you don't have to spend resource points on dropping Arty.
Scout Mechs... ALWAYS have a Scout with you. The RAVEN is one Mech you don't want to leave home without. It will jam the enemy's sensors and hide your location from their scans. It will also locate and ID the enemy long before you get to them. They only time you might want to drop without one, is when you drop with the Raven's bigger badder brother... The Men Shen . If you can - drop that one instead. It's nice for a Scout to have good punch. I only load long range weapons on my Scouts. If the enemy gets too close - just bug out. Lead them into your ambush. The enemy is very stupid and will follow you most of the time.
More about those LRMs... in later mission you will get something called the SWARM LRMs. These things ROCK. They cause an area damage across the target or around the target. Remember about what I said about damaging the head? These things do that A LOT. Once you get SWARM LRMs, use them in large quantities. Word of caution - they can damage you too if your firing them at bad guys that are mixing it up in close quarters with your guys.
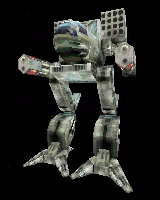
Some of my favorite Mechs:
Enfield, Cougar, Highlander, Lau Hu, Men Shen, Sha Yu, and the Raven.
The Enfield is a good well balanced medium Mech that can pack a wide array of weapons... It's my main choice for most missions. Try to salvage as many as you can. The Cougar and the Sha Yu are lighter Mechs that used in numbers will just deliver a killing blow to even the heaviest Mechs. They are fast too. Good Mechs for a raiding party. Use them if the mission calls for you to get in and get out fast. In the last missions, the Lau Hu will be the one you want. 75 tons, jump capable, and heavy duty firepower makes this one of, if not THE most dangerous Mechs you face... or can use.
Well, that's it for right now... maybe more later if I have some thoughts.
I have some more... People have asked how to get a good start on the missions... (in so many words) so I'll give you some more tips on how to get rolling. The key is your set up for each mission. Listen to the briefing and read the mission notes carefully for each mission.
Mission One: Just follow the commands and you'll get through. Keep an eye on the minimap and what your sensor is picking up. Rush the LRM carriers. When you salvage an Urbanmech, don't bother to repair it. You don't need it, but you can sell it after the mission.
After Mission One: Your next mission is to retake a small base. Not too difficult stock, but much easier if you get set up right. 1st thing, unload that Urbanmech. They are totally worthless for you. You don't have a lot of tonnage to work with so you can only drop a couple Mechs. Sell the Urbanmech and grab another Razorback 2 Razorbacks and 2 Bushwackers will allow you to walk the planet with nothing to fear. But not in stock form. You can mod your Mechs however you like - that is the fun of the game. But let me give you my formula. As I said before... I like long range weapons and LRMs work nicely. They give you a good economical punch and as long as a target is sighted, other Mechs out of the line of sight can still fire at the target. My Bushwackers do real well with 2 PPC's, 2 Heat sinks, 7 LRMs, and 1 additional armor. The Razorbacks does well with 1 large laser, jump jets, 1 heatsink, and 5 LRMs. That sounds weak on the surface, but 5 LRMs will dish out 15 points of damage and the Large Laser will throw out anther 4 points of damage for a total of 19 points of damage out of 1 salvo from a little tiny 30 ton Mech. That aint bad. When selecting your pilots, pick pilots that have a sensor specialty and put them in the Razorbacks. With this kit - the next mission is a snap.
Mission Two. Search every area of the map for any resource bunker, or resource truck... Salvage everything you can. After you defeat mission two, you have the chance to select any destroyed Mech you want... all the mechs you knocked out - if the core didn't explode, it's salvageable. The price at this point is only about 75% that of the buying/selling prices. Take all you can to resell.
Mission Three: Ambush and Acquire: Mobile HQ. This one is only a little tricky. You can keep your same 4 mech team, of drop two Razorbacks for another Bushy. Your choice. I'll take 3 Bushies outfitted as described above because you don't really need a scout here. The addded firepower and armor protection of a 3rd bushy will outweigh the 2 Razors in terms of horsepower. A Razor can get ripped apart pretty quickly and then your in trouble. There is a big hill near the little base... just north of the hill is some fuel tanks. curve around to the east of the hill, take out the turrets there and then pop the fuel tanks... from long range. Now you'll get some visitors coming down from the north. Climb that big hill you went around to get some higher ground. Attack an enemy from the higher ground when ever you can. Sun Tzu said so. Once those guys are down for the count, get back up on the hill to where your overlooking the roadway and the convoy will roll in under your guns... or in this case your launchers. (Insert evil grin here) Don't tag the fuel truck if its near another truck... but if it's near an enemy Mech - all the better. Snake the resource truck and then the HQ and head north. Just north of the turrets you deactivated are a couple resource trucks and further northwards you have some civilian buildings... once you get up there you'll find another resource truck and a bunks further north of that still. Then head over to the last objective point. Let me give you a hint here. Air strikes. Use them sparingly. 2 hits will kill a turret generator. Use two to kill the T-G in the base and you can approach the base with out problems. See that hill that overlooks the base? Climb up there and spot the enemy units and fire on them... when you get a couple fireants to come your way... nail one of those ammo bunkers. Big Boom here. Then go in the base, mop up, and capture the HQ. You'll get the message that some bad guys are coming your way to counter attack. Get back up on that hill overlooking the base and where the approach to the base is. Drop 2 artillery pieces on that hill and camp your Mechs there with the HOLD command activated. Then select all the units and guns together. As the enemy draws near... blast the crap out of them and mission is won. 2 or even better 3 long tom artillery pieces do WONDERS. You can kill an Atlas with one salve from 3 Long Toms. Think about what that is going to do to a little 50 ton Starslayer.
Mission 4: Search and Destroy Bandit Convoy. For this mission I'm taking 2 Bushys, a Starslayer and a Razorback. The Starslayer I've modded with 2 large pulse lazers, 7 LRMs, jumpjets, and one heat sink. On this mission I also make change to the Razorback. I remove the jumpjets and large laser and heat sink. I then install another LRM rack and a large Pulse laser. Heat is 22/22 so I'm pretty much maxed out. When the mission starts, be careful. You start out at a disadvantage because just north of you on high ground is a bunch of badguys ready to pounce on you. You don't need to engage those guys because you wont get any extra points for doing it. Instead, head due west till you hit a shoreline. Then head north till you see where the Bandit Convoy is parked. Hit them hard and fast. The enemy fireants are a pushover... just run through them and nail those trucks. As soo as they know your there, the convoy is going to get moving... crush them ASAP. The little strong point is unguarded to the south. Nail the generator to deactivate the turrets. 2 Urban mechs will jump you here so slap them down quickly. You'll be told to take possession of a weapon facility. It's an uphill fight so if you have a lot of LRMs, you'll have an advantage. This mission is a pushover.
Mission 5: Night Ops: Liao Raid. Again, this mission is a cinch if your outfitted properly. So let's get ready. From mission 4 I salvaged 2 Sha Yu mechs... These guys are great. 15 tons lighter than a Bushwacker, with jumpjets and Intermediate sensors. They make good scouts because they have a decent weapons load out. You can pack it with 2 PPCs and 3 LRMs (if you remove the jumpjets). That's a good deal of punch for a small scout mech. I also outfitted another Sha Yu with 1 PPC and 6 LRMS. I also snagged an Anubis. I'll take it on this one. I outfitted it with 1 large pulse laser, and 4 LRMs. The drop team here is 2 Bushys, 2 Sha Yus, and the Anubis. Let me give you a hint here... never go for the Front Door. Skirt wide and go around back of everything. When the enemy get near fuel tanks... pop the fuel tanks. You'll get good salvage out of this one.
After Mission 5... You'll have 3 choices of where to go. From here, your on your own. Your on the way to taking Carver V by storm. If you have any problems... give me a shout out and I'll fill you in on how to best that situation.